Difference between revisions of "Wiki manual"
From Learning and training wiki
| Line 210: | Line 210: | ||
| − | '''Important note:''' | + | '''Important note:''' The table template is not compatible with the other templates, i.e. a table cannot be contained inside another template. It is necessary to close the template (to do so use the closing braces: }}) before creating a table. The same template can be re-opened afterwards. |
| − | The table template is not compatible with the other templates, i.e. a table cannot be contained inside another template. It is necessary to close the template (to do so use the closing braces: }}) before creating a table. The same template can be re-opened afterwards. | + | |
Revision as of 17:51, 4 January 2012
Click4it learning and training wiki - Step by step user guideThis user guide should enable you to start working on the wiki and, in particular, to maintain the required formatting style. Should you need any additional information or clarification, do not hesitate to contact us at click4it@unitar.org
IntroductionWhat is a Wiki?A wiki is a page or collection of web pages designed to enable whoever is given the editing rights to contribute or modify content, using a simplified markup language. Wikis are often used to create collaborative websites and to power community websites.
Who can write on the wiki?To assure the quality of the material that is published on the Click4it wiki, only registered users are granted editing rights. It should be noted that in order to make any modifications on the wiki, users should be logged in.
What is a template?A template is a standard element that can be used to create other pages with the same layout. The goal of having templates for the wiki is to streamline the content creation process, so that users do not need advanced HTML editing skills.
{{Term|TERMNAME|Definition}}
Getting startedIn this section, you will be introduced to some basic notions you need to acquire for creating and editing content.
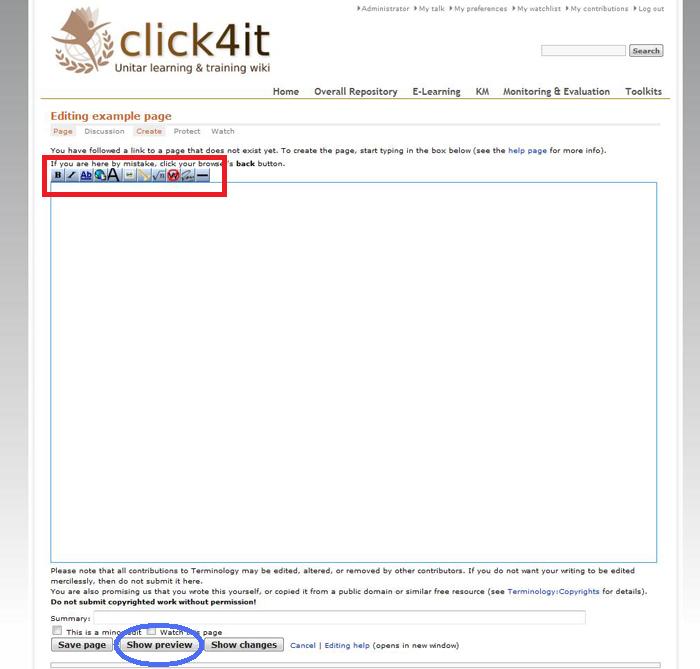
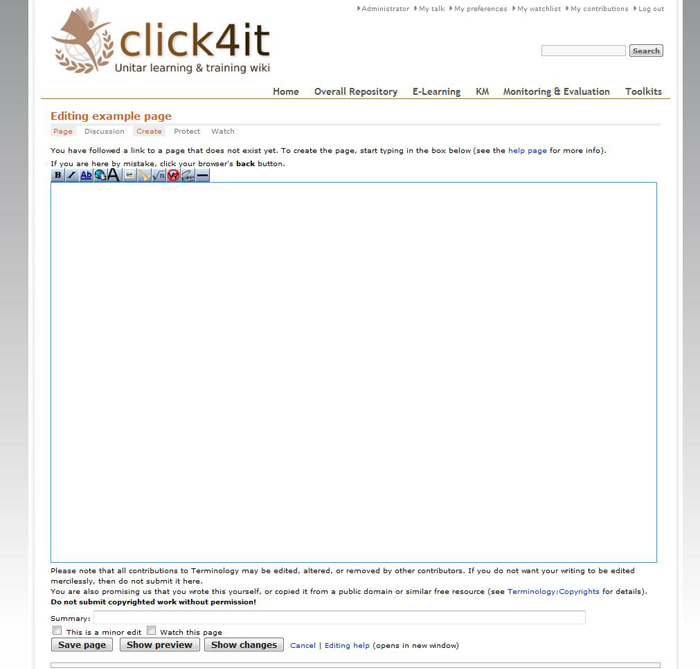
The editorBefore exploring how to create a new term, let us get familiar with the editing environment. When a new element is created, an empty editing page like the one shown below appears:
Using templatesIn order to have the wiki harmonized, new definitions, toolkits and other sections are to be created using the corresponding templates. Please follow the instructions to make sure you use the right format: it is important to maintain consistency throughout the wiki.
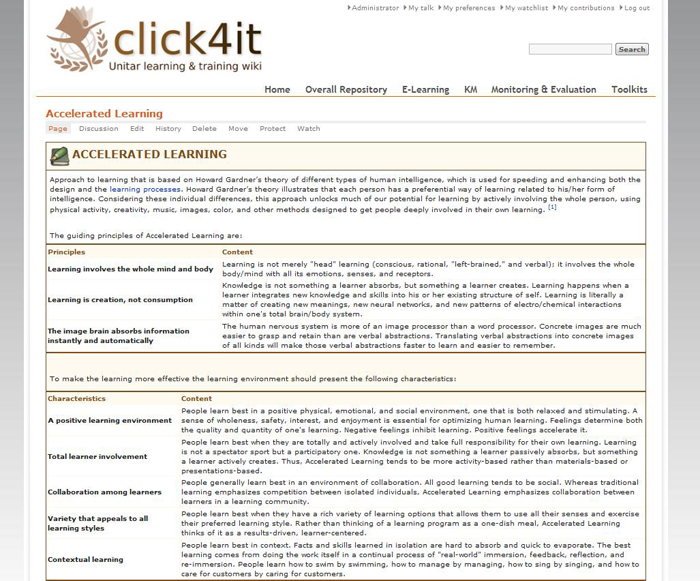
Creating a termThe terms contained in the Click4it are listed alphabetically in the Overall Repository. They consist of a definition, whose length can vary from a few sentences to a very long text, and might also include a toolkit or other additional materials. This section will guide you through the creation of a new term page and instruct you on how to use the Term template.
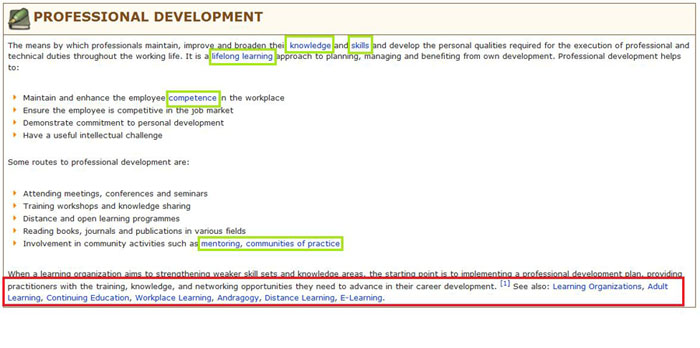
Adding in-text referencesWhen you create a new term, it is essential to include a reference list at the end of the page containing all the sources you used for your definition. In order to maintain the definition easy-to-read and uncluttered, references have to appear in the form of a footnote at the bottom of the page; see picture below:
When referencing websites, please indicate both the full URL and the text tag you want to appear. Example: www.mywebsite.com (November 2011)
Adding linksAt the end of your definition, if relevant, please include a See Also section, i.e. a list of terms that are already available on the wiki and are related to the term you are compiling. Also remember to place an internal link every time you mention one of the existing terms in the body of your definition.
The following categories are currently available: e-Learning, Knowledge Management, Monitoring & Evaluation.
Advanced editing optionsInserting a tableTo add a table to your definition, use the syntax below. The number of columns can be customized according to your needs; to create a new row, simply add a new section starting with |
Modifying an existing page
- Go to the page you want to modify and select Edit. This tab is located on the top of the wiki page, right above the title.
- In the editing section, position the cursor on the point where you want to make corrections and/or modifications (add simple text, link to some other page of the wiki, etc.) and start typing.
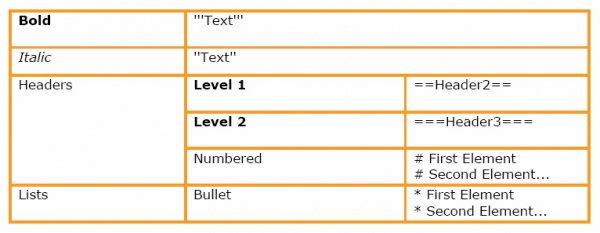
- Please refer to the list of basic syntax needed to edit a page.
- Formatting text:
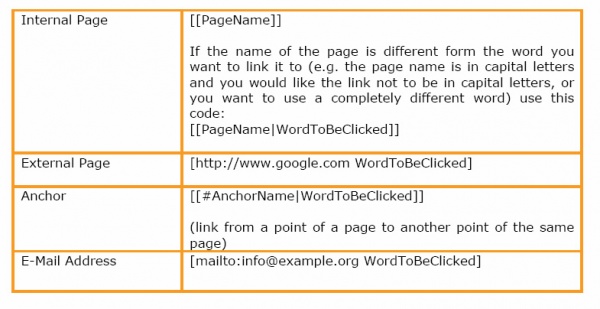
- Adding links:
- Uploading files or images:
- Adding tables:
- The basic way to add a table is to use the syntax below, adding as many columns as necessary. The number of columns depends on the number of headers set at the beginning. To create a new row, add a new section by typing |-
- {| class="wikitable"
- |-
- ! header 1
- ! header 2
- ! header 3
- |-
- | row 1, cell 1
- | row 1, cell 2
- | row 1, cell 3
- |-
- | row 2, cell 1
- | row 2, cell 2
- | row 2, cell 3
- |}
- Note: The template and the table are not compatible: it is not possible to use a table inside a template. It is necessary to close the template (using this: }} ) before editing a table. Another template can eventually be opened afterwards.
How to add a reference to the References list
If you have added new information to a definition and you want the source to appear in the list of references at the end of the page, in the form of a footnote, follow these steps:
- Identify the place in the text where you want the footnote to appear and position the cursor on that spot. (As you will notice later on, once you've saved the footnote, you will see the number linked to the list of sources at the end of the page, not the source itself, even if you have to type it here).
- Add: <ref>title of the book or website (date of consulting)</ref>
- If it is not already written, add: <references/> at the end of the page.
- In order to keep the style of the pages homogeneous, enter 4 rows between the definition and the References section and add a title for it using this syntax: ==References==.
- The sources should also be included in the Bibliography of the website, where you can find two lists, one for the books and articles and another one for the websites. Websites should be added on the top of the list, always including dates when they were consulted.
Adding new terms, toolkits, material
In order to have the wiki harmonized, the respective templates need to be used whenever materials or toolkits are added or a brand new definition is created. Follow these instructions to be sure to use the right format, keeping the click4it consistent.
Adding a new term
To add a new definition, you will need to create a new page called as the term you want to include. The easiest way to create a new page in a wiki is to create a link to it from an existing page.
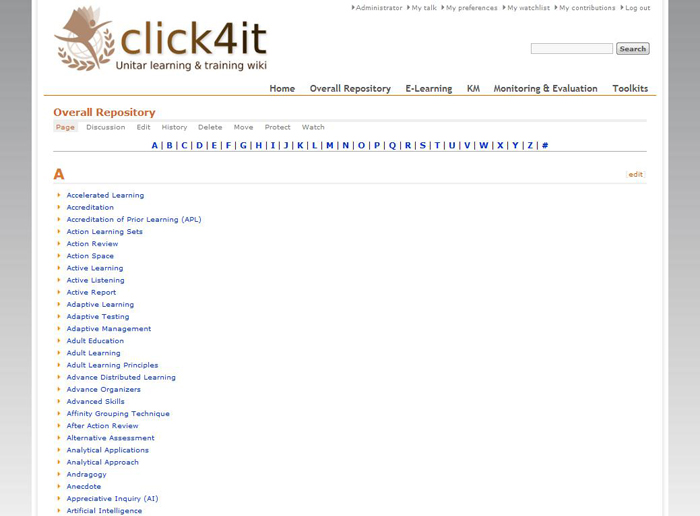
- Go to the Overall Repository page.
- Select edit and add a link ([[Page Name]]) respecting the alphabetical order. The link will appear red, to show that this page does not exist yet.
- When you click on the red link, the following page opens:
- Now you can start entering text in the WYSIWYG editing box. When you finish and click on Save page, your entry will appear on a wiki page. As explained in the Introduction, you can use the WYSYWIG toolbar to perform basic formatting.
- Use the template called term: {{Term|TERMNAME|Definition}}
- Use the instructions given in section A (page 6) to edit the page, add links to websites or documents, add references and tables.
- Note that it is not possible to integrate a table inside a template. If you want to have a table in the definition, you will have to close the template by entering : }}) and then add the table.
- If you would like to add more information in the definition below the table, add the template Termaddition:{{Termaddition|Text}}.
- The result will be a simple box, with the blue lines framing it and no title. It will look like the template is following from the previous one.
Text - Below you can see an example of the use of table and of the Termaddition template:
- The template definition ends before the first table. The text between the first and the second table and the last sentence are contained in the template Termaddition.
- Once the new definition has been created, all the sources of the information contained in it should be cited in the References section at the end of the page. The instructions to do so are in section A (page 8).
- The sources should also be included in the Bibliography of the website, where you can find two lists, one for the books and articles and another one for the websites. Websites should be added to the top of the list, always including dates when they were consulted.
- Once you have created the term in the overall repository, a link to it should also be added in the other terminologies where the term might belong to. For example, if the new term is related to e-learning, a link to it should also appear in the E-learning list. The following categories are currently listed: E-learning, Knowledge Management, Monitoring & Evaluation.
Adding a Toolkit
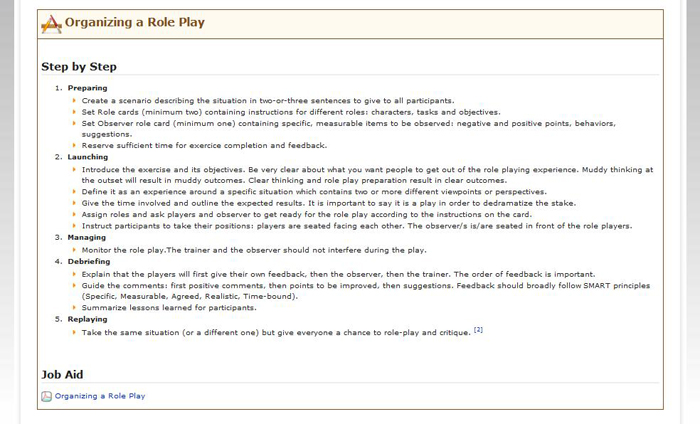
If a definition already exists, or you have already created it, and you want to add more information on how a particular method can be used, or how to put in practice a particular technique, you can use the toolkits template. The information contained in this section is supposed to be Step-by-Step or General Guidelines format. Below you have an example of a toolkit from the click4it website:
- Go to the page of the definition where you would like to add a toolkit and click on Edit.
- Enter four empty rows between the end of the definition and the References section.
- Use the template called Tool: {{Tool|ToolkitTitle|Text}}
- Use the instructions given in section A (page 6) to edit the page, add links to websites or documents, add references and tables.
- If you want to add a table, you should close the template and open a new one afterwards, as explained under point 7 of the previous section (page 10).
- Add the link to this page in the Toolkit Section, so that the users may know that they will be able to find more detailed information for that term.
Including additional material
If you have files related to a term that could be useful for other users of the click4it website, you might want to add a section of additional materials. Additional materials must be uploaded in a PDF format.
- Go to the page of the definition where you would like to include additional material and click on Edit.
- Enter four empty rows between the end of the definition or the toolkit (if it exists) and the References section.
- Use the template called Addmaterial: {{Addmaterial| List of files}}
- Create links to the files that you should have uploaded beforehand, as explained in section A (page 6). The syntax to link a site is: [[Media:FileName.extention|WordToBeClicked]]
- In the same line where you create the link to each file, in front of the link, add a small PDF file icon by typing this: [[Image: pdf.png]] so that the user may know what kind of file he/she is downloading (as shown in the image above).
Adding a list of web resources
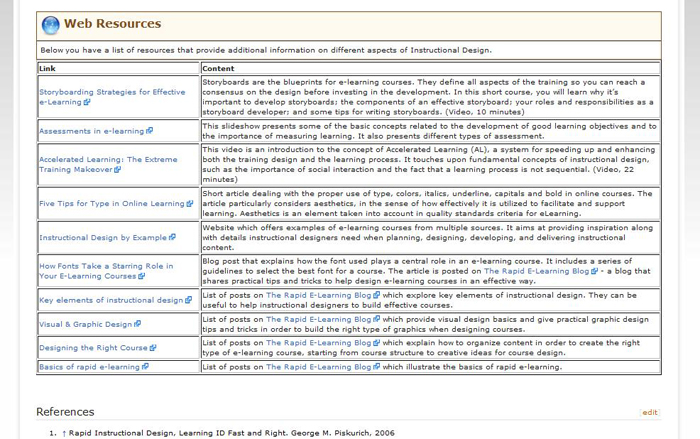
Whenever you come across interesting websites related to a term on the click4it site (information, tools, examples, etc.), you might want to create a section to display all of these links. When creating this section, include a brief explanation of what kind of information/materials are available on the page, so that the user would have an indication of the sort of information/material he/she will find in the link. As shown in the example below, a good way to organize the information for this section is to use a table format.
- Go to the page of the definition where you would like to add a list of web resources and click on edit.
- Enter four empty rows between the end of the definition, the toolkit or the additional material (if these sections exist) and the References section.
- Use the template called Addlink: {{Addlink|List of resources}}
- Create the links to the websites. The syntax to create a link to a website is: [http://www.google.com WordToBeClicked]
- It is a good rule to repeat the website name this way: [http://www.google.it www.google.it], so that the user sees which is the site he/she will be directed to.
- If you want to present all the links in a table format, you can use a different template: Addtitle: {{Addtitle}} starting right after the blue title - Web Resources.
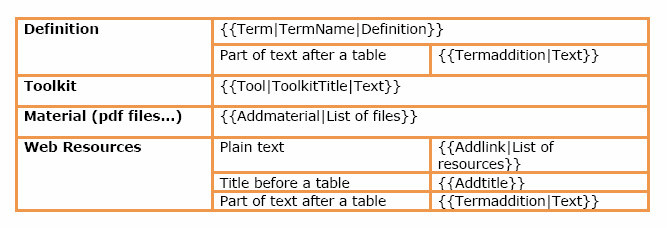
Template- Quick reference list
}}
